
In today’s world, more and more things are running virtualized. Increasingly popular are those little things called “containers”. I feel like these are slowly replacing the “old” fully fledged virtual machines (VMs) in many areas. Yet they still exist and I still use them quite frequently.
The following talks mostly about my own typical server setup, which is Debian + VirtualBox. However, principles may apply to different setup types (non-Debian, containers) too.
When running a VM on a server, I often need to assign them dedicated IP addresses. How I do this depends a little on the host and the VM, but for my Debian + VirtualBox setups in the past I relied on a very old guide from Hetzner (partially still available here, german only). The guide pretty much suggested this config:
auto virbr1
iface virbr1 inet static
   address (Host IP)
   netmask 255.255.255.255
   bridge_ports none
   bridge_stp off
   bridge_fd 0
   pre-up brctl addbr virbr1
   up ip route add (Additional IPv4)/32 dev virbr1
   down ip route del (Additional IPv4)/32 dev virbr1
(This shows IPv4 only – IPv6 is highly similar, with inet6 instead of inet, all netmasks replaced by IPv6 compatible syntax and ip -6 instead of ip)
This is something that you would put into /etc/network/interfaces and then tell VirtualBox to use that interface as a bridge. Then you could configure the guest as you would configure a host by putting the additional IP as static IP and setting the host IP as gateway.
What this technically does is it creates a new interface using brctl (command from the bridge-utils package) which is then configured as some type of “fake bridge”, because we don’t actually assign it an interface to bridge to. Instead we tell the kernel that we want packages to our additional IP get forwarded into this virtual interface, where it gets picked up by our VM [This obviously requires forwarding enabled in the kernel, e.g net.ipv4.ip_forward=1 for IPv4 and net.ipv6.conf.all.forwarding=1 for IPv6].
This used to work nicely for quite a few years – I believe I’ve been using this setup since either Debian jessie or stretch – somewhere around that. However, on upgrading to Debian bullseye, it broke – the VMs would no longer receive any packets.
I’m still not sure what broke it – the new 5.10 kernel or a change in bridge-utils probably1 – but I found a solution, hence this blog post. Instead of creating a “fake bridge”, just use a tuntap virtual interface. My new workflow is like this:
Have a bashscript running on boot that pretty much does this:
#!/bin/bash
ip tuntap add mode tap virbr1
ip addr add <Host IP> dev virbr1
ip link set virbr1 up
ip [-6] route add <Dedicated IP>/<Netmask> dev virbr1
(I’ve retained the “virbr1” interface name from the example above for consistency)
You can probably convert the above bash script into a syntax compatible with /etc/network/interfaces, but I decided to not bother with that – nowadays theres often additional network management software installed which just interferes with the old file.
The approach is functionally still the same: It’s a routed configuration that forwards packets from the incoming physical interface to the virtual tuntap interface, where they get picked up by the VM – and vice versa for outbound packets. The use of the tuntap interface just avoids the bridged interface, which doesn’t work anymore anyway.
This approach seems to be suggested by the new Hetzner documentation, altough they lack examples on how to setup such a tap interface – hence my example above.
For full completeness, I will also shortly show how to configure a VM to use this virtual interface:
First of all, make sure IPv4/IPv6 packet forwarding is on – it’s not going to work otherwise. Second, configure VirtualBox to use the virtual interface as a “bridged adapter”, like this:
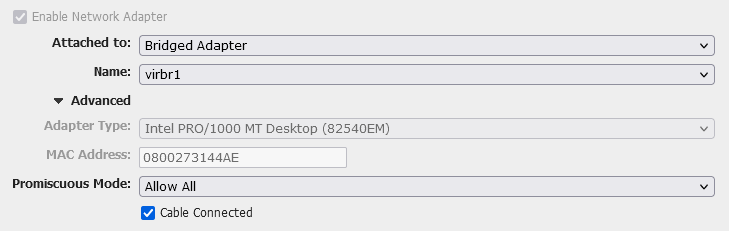
If you don’t have a GUI for VirtualBox, you will need to figure out the VBoxManage command to do the same thing – good luck with that.
Then, configure your guest like this (example for /etc/network/interfaces)
auto enp0s8
iface enp0s8 inet[6] static
  address <Dedicated IP>
  netmask <Netmask>
  gateway <Host IP>
(The name of the interface – enp0s8 – depends on how your guest OS names the bridged adapter from VirtualBox – check ip a on the guest)
And that’s it. That’s the very short tutorial on how to assign your VM’s dedicated IP addresses (v4 or v6, or both).