Recently, it happened to me as well: I ran out of disk space on a “production” system, and all hell broke loose. So here’s the short postmortem:
The trigger was me playing around with server-side LDAP settings. Ironically those were intended to make stuff more stable and prevent outages. The new config was enabled, I verified that the LDAP clients could still logon and everything.
The next day, everything seemed to be fine. That was, until some scripts on one of my machines started behaving a bit erratically. It logged a few unusual errors (such as being unable to write to a file), but everything else seemed normal – no service was down. Eventually stuff started crashing at about the same time when I started investigating the unusual errors.
Analysis quickly pointed to disk trouble: A failing disk perhaps? No, #df -h revealed the problem: /dev/mmcblk0p3 55G 55G 0 100% /. The 64 GB eMMC on my Odroid had completly filled up to 100%. The normal disk usage on that eMMC is at around 20 GiB. So who had eaten around 35 GiB of disk space? Further checks with #du -hs /var/lib/docker/containers appointed the blame to Docker: One of the containers was over 30 GB in size!
How could that happen? Well, remember the LDAP changes? On the machine, the affected container contained a login routine that was trying to login via LDAP. This had ran into a hiccup where the routine failed to login1, logged an error, then tried again. It was doing this on an infinite loop – there was no backoff or retry count/timeout built into it.
The sheer amount of error lines emitted by the routine caused the docker container’s log file (which is in json format by default) to grow huge. And now to the real surprise: The Docker default json logging driver does not have any sort of rotation or size limit build into it! It just fills your disk until eternity. The docker configuration manual has a notice that warns about this behaviour, but honestly who digs so deep in that manual? It’s not like it’s a top-10 page or something. Why the heck is this the default? “For backwards compatibility reasons” – well, then why don’t we change it for new setups only? I think this is a really stupid design decision, but yeah.
So, lessons learned:
On all new docker installs, change /etc/docker/daemon.json to use the local log driver, or json with a size limit configured.
Monitor your disk usage at all times, with alerting if stuff becomes critical.
Implement backoffs for operations that should be retried. Don’t hammer infinite loops when stuff doesn’t work.2
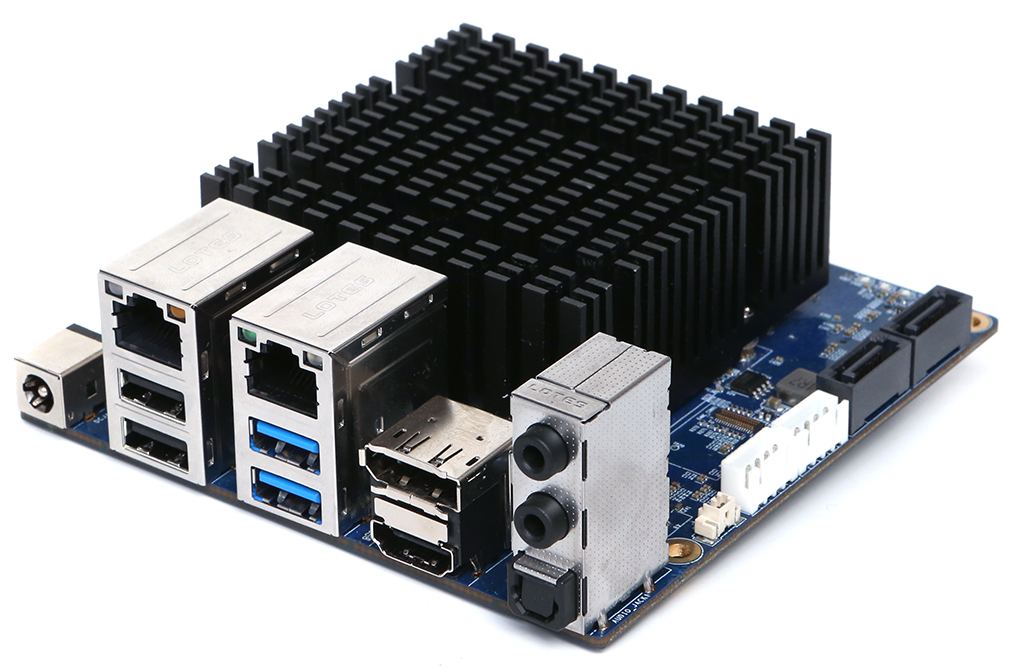
Recently, I have been playing with UEFI secure boot and custom modules. I am one of the lucky people to own one of the discontinued Odroid H2+ models, a small board with decent computing capabilities.
The Odroid features an x86 CPU, so there are no ARM weirdnesses to worry about. However, the default BIOS setting of this board seems to be UEFI Secure Boot off. But what even is Secure Boot?
Secure Boot is a method to prevent Rootkits and other malicious software to execute code during boot. While the system is booting, it is generally less protected. If the operating system has not yet loaded, any protection provided by the OS is not yet working. The earlier something runs in the boot process, the more power it has: It can control all execution after itself.
While Secure Boot also has weaknesses and it sometimes debated, it is supposed to alleviate some of these concerns. UEFI Secure Boot ensures that all code part of the boot sequence is authenticated and has not been tampered with.
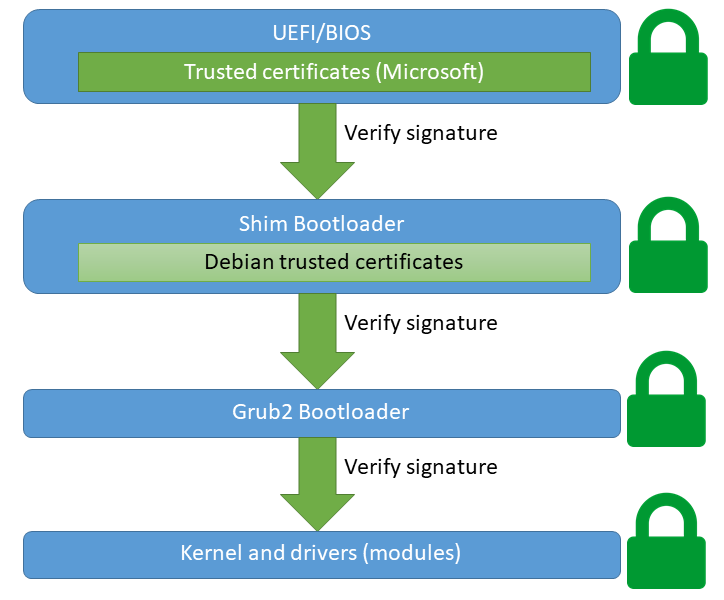
This graphic means that everything involved during the boot processes must be signed by a trusted certificate. We’re assuming Debian here. By default, most mainboards (UEFI’s) only ship Microsoft’s Root UEFI certificate. Most first-party bootloaders will therefore be signed with Microsoft’s key, to be compatible everywhere.
However, non-Microsoft projects use their own infrastructures and don’t want/can’t have every update signed by Microsoft. Instead, they use their own certificates. My Debian 11 uses two certificates for this, including Debian Secure Boot Signer 2021 and Debian Secure Boot CA. These certificates ensure that non-Microsoft signed code can load. A so-called “shim” bootloader is signed by Microsoft and will load the Debian-specific code and certificates. Therefore only the shim needs to be signed by Microsoft.
Also, in case this was not clear: UEFI Secure Boot requires an UEFI boot. If your OS was installed via the legacy BIOS system (you’re booting legacy), you can’t use UEFI features such as Secure Boot. You will need to migrate to UEFI first, which often involves a difficult bootloader swap or just reinstalling the entire system with UEFI enabled. Modern systems usually come with UEFI on by default.
My Odroid H2+ has two Realtek 8125B 2.5 Gbit network cards onboard. These are damn nice things, multi Gigabit for a cheap price. However, as with all new hardware on Linux, one question is always there: “Does it work with my Linux kernel?”.
If you run an operating system with Linux kernel 5.9 or higher (Debian 11, Ubuntu 20.04+ with HWE kernel…), the answer is yes: It will work out of the box, as the R8169 module/driver shipped with the kernel supports RTL8125B since 5.9.
However, my tests indicated that while the network cards indeed work, throughput wasn’t great: I was getting barely 2 Gigabit/s in an iperf3 test, nothing close to the 2.5 Gbit/s promised by the specification. So I had a look around whether there are better drivers. Indeed it looks like there is:
Realtek indeed seems to ship its own first party driver – it’s even open source and GPL licensed, but not included in the official Linux kernel source tree. Still, I tried out this project, which builds a nice DKMS kernel module out of the Realtek driver. DKMS is “Dynamic Kernel Module Support”, a framework to generate and load kernel modules easily. It takes care of things like recompiling your modules when you upgrade your kernel or switch configurations.
After installing the DKMS module, we had the new Realtek driver (module) available. However, even after a reboot it wasn’t active: My kernel seemed to prefer its inbuild R8169 module, so I had to explicitly block that (using the method described in the readme). After this, my kernel was forced to load my new Realtek R8125B module.
That was a great success! The new module achieved a steady 2.5 Gbit/s throughput with various HTTP/iperf speedtests, just like the specification promised.
Then I enabled UEFI secure boot. And all of my network connections broke 😞. I realized the issue: My DKMS module was not UEFI signed, so the Secure Process would refuse to load it. The OS would still boot, but without the module. Because I had disabled the R8169 module, no network card driver was available.
Obviously I could just have disabled secure boot again, but that would be no fun, would it? Instead, I wanted to get Secure Boot running and keep the R8125B Realtek module. After a bit of googling, it appears that the preferred way of doing this is by employing a so-called Machine-Owner Key (MOK). That is essentially just a certificate + private key that you generate, own, and control. You add that certificate to your UEFI certificate storage, where it will be retrieved by the shim loader. It will then be available to validate kernel modules. Note that this key can by default validate everything, including your own bootloaders, kernels etc. It is possible to limit the MOK to be only valid for kernel module validation (this involves setting a custom OID on the certificate), but doing this is out of scope for this blog post. Our certificate can be used for any purpose, including loading of DKMS modules – if you have signed them with your key.
There are various tutorials out there for various distributions and versions thereof. Here’s what I did – I hope that this is the recommended way, but I’m not entirely sure.
IMPORTANT: If you’re doing this on Debian (like I did), please read Debian’s notes about Secure Boot. It includes compatibility warnings and some pitfalls, such as validation issues in certain cases.
First of all, we need to generate our MOK, meaning a certificate and key. UEFI uses standard X.509 certificates, so if you’re familiar with them this is nothing new:
# Note: This command, and pretty much everything
# else needs to run as root.
openssl req -new -x509 \
-newkey rsa:2048 \
-keyout /root/uefi-secure-boot-mok.key \
-outform DER \
-out /root/uefi-secure-boot-mok.der \
-nodes -days 36500 \
-subj "/CN=Odroid DKMS Signing MOK UEFI Secure Boot"
For those unfamiliar with X.509/OpenSSL, here’s a quick overview: This command generates new RSA private key and corresponding self-signed certificate. We store the key in /root/uefi-secure-boot-mok.key (only accessible as root, important so that no malicious non-root party can use our key) and the certificate in /root/uefi-secure-boot-mok.der. The certificate is valid for 100 years, which isn’t ideal for security, but I am lazy. If you’re paranoid, you might want to lessen the lifetime and rotate your MOK from time to time. You might also want to consider using something else than RSA 2048 keys, but consider that your UEFI loading process must support it. The Subject Common Name (CN) is arbitrary, choose whatever your like.
Next, we need to import that certificate into our UEFI firmware store, where it can be loaded by the shim. Debian and other distributions (like Ubuntu) provide excellent tooling support for this: The Mokutils and MokManager. Basically, we just run this command (as root):
mokutil --import /root/uefi-secure-boot-mok.der
When you run this command, it will ask you for a password. Choose any password, but consider the following:
You will need to type in this password in a short time again. You will only need this password once, it’s a one-time use thing.
You will type in this password in an environment that will likely not use your native keyboard layout, but a default QWERTY one. If possible, choose passwords that you can type even on foreign keyboard layouts.
This does not actually do any real import. What this does instead is it marks this certificate as pending for inclusion for the MokManager. The MokManager is a EFI binary (i.e. a bootable system) included with UEFI-enabled Debian/Ubuntu systems. This is the actual workhorse that will do the import.
We now reboot the system, just use the reboot command or whatever you prefer. Ensure that you have access to a display and keyboard physically connected to your device. After the reboot, you will be presented by the MokManager waiting for you. You probably need to press some key to confirm, otherwise it will just revert to a standard boot. Once you are in the MokManager, just navigate through the options it presents to you. Press “Enroll MOK”, “continue”, “yes”, then enter the password we just setup. The MokManager may use a different keyboard layout! Once that is done and your password is accepted, select OK and wait for the reboot. Your MOK is now installed!
With the MOK installed, the final piece is to sign our DKMS modules with our key. This is very easy with Debian 11 installations, as there’s a ready made helper for this. We just need to edit two files:
Edit /etc/dkms/framework.conf and remove the comment regarding sign_tool:
## Script to sign modules during build, script is called with kernel version
## and module name
sign_tool="/etc/dkms/sign_helper.sh"
We also need to tweak the sign tool slightly, edit this file too and adjust the paths of the certificate and key:
Just use the same filenames and path’s you’ve used while generating the cert + key above. This tutorial uses the same names and paths in all examples for consistency.
Now, we’ve almost done it! DKMS will now sign all modules while they’re build/installed, no additional configuration necessary!
In case you have already installed (unsigned) DKMS modules, we will need to re-build them to ensure they get signed. For my realtek module this involves the following (root again):
dpkg-reconfigure realtek-r8125-dkms
The exact command here varies depending on what modules you have, but the general idea is to call dpkg-reconfigure for each DKMS module you have. DKMS modules itself should be managed by Debian’s “.deb” package system, which is is called dpkg. The Realtek DKMS module is installed by a .deb package called realtek-r8125-dkms, hence the above command will re-install this DKMS module.
Finally, reboot a last time and your modules are now loaded – with UEFI secure boot on!
In today’s world, more and more things are running virtualized. Increasingly popular are those little things called “containers”. I feel like these are slowly replacing the “old” fully fledged virtual machines (VMs) in many areas. Yet they still exist and I still use them quite frequently.
The following talks mostly about my own typical server setup, which is Debian + VirtualBox. However, principles may apply to different setup types (non-Debian, containers) too.
When running a VM on a server, I often need to assign them dedicated IP addresses. How I do this depends a little on the host and the VM, but for my Debian + VirtualBox setups in the past I relied on a very old guide from Hetzner (partially still available here, german only). The guide pretty much suggested this config:
auto virbr1
iface virbr1 inet static
   address (Host IP)
   netmask 255.255.255.255
   bridge_ports none
   bridge_stp off
   bridge_fd 0
   pre-up brctl addbr virbr1
   up ip route add (Additional IPv4)/32 dev virbr1
   down ip route del (Additional IPv4)/32 dev virbr1
(This shows IPv4 only – IPv6 is highly similar, with inet6 instead of inet, all netmasks replaced by IPv6 compatible syntax and ip -6 instead of ip)
This is something that you would put into /etc/network/interfaces and then tell VirtualBox to use that interface as a bridge. Then you could configure the guest as you would configure a host by putting the additional IP as static IP and setting the host IP as gateway.
What this technically does is it creates a new interface using brctl (command from the bridge-utils package) which is then configured as some type of “fake bridge”, because we don’t actually assign it an interface to bridge to. Instead we tell the kernel that we want packages to our additional IP get forwarded into this virtual interface, where it gets picked up by our VM [This obviously requires forwarding enabled in the kernel, e.g net.ipv4.ip_forward=1 for IPv4 and net.ipv6.conf.all.forwarding=1 for IPv6].
This used to work nicely for quite a few years – I believe I’ve been using this setup since either Debian jessie or stretch – somewhere around that. However, on upgrading to Debian bullseye, it broke – the VMs would no longer receive any packets.
I’m still not sure what broke it – the new 5.10 kernel or a change in bridge-utils probably3 – but I found a solution, hence this blog post. Instead of creating a “fake bridge”, just use a tuntap virtual interface. My new workflow is like this:
Have a bashscript running on boot that pretty much does this:
#!/bin/bash
ip tuntap add mode tap virbr1
ip addr add <Host IP> dev virbr1
ip link set virbr1 up
ip [-6] route add <Dedicated IP>/<Netmask> dev virbr1
(I’ve retained the “virbr1” interface name from the example above for consistency)
You can probably convert the above bash script into a syntax compatible with /etc/network/interfaces, but I decided to not bother with that – nowadays theres often additional network management software installed which just interferes with the old file.
The approach is functionally still the same: It’s a routed configuration that forwards packets from the incoming physical interface to the virtual tuntap interface, where they get picked up by the VM – and vice versa for outbound packets. The use of the tuntap interface just avoids the bridged interface, which doesn’t work anymore anyway.
This approach seems to be suggested by the new Hetzner documentation, altough they lack examples on how to setup such a tap interface – hence my example above.
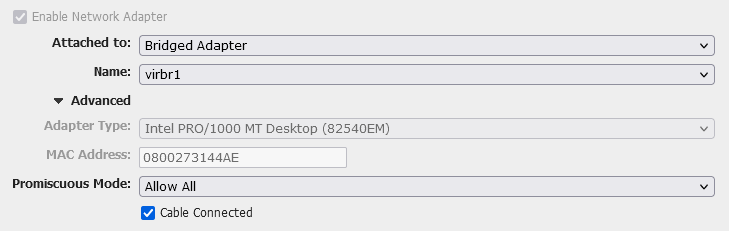
For full completeness, I will also shortly show how to configure a VM to use this virtual interface:
First of all, make sure IPv4/IPv6 packet forwarding is on – it’s not going to work otherwise. Second, configure VirtualBox to use the virtual interface as a “bridged adapter”, like this: