Categories
Linux Server Administration

UEFI Secure Boot, Debian, DKMS and the R8125B

Recently, I have been playing with UEFI secure boot and custom modules. I am one of the lucky people to own one of the discontinued Odroid H2+ models, a small board with decent computing capabilities.

Odroid H2+ mainboard with components fitted.
https://wiki.odroid.com/odroid-h2/start

The Odroid features an x86 CPU, so there are no ARM weirdnesses to worry about. However, the default BIOS setting of this board seems to be UEFI Secure Boot off. But what even is Secure Boot?

Secure Boot is a method to prevent Rootkits and other malicious software to execute code during boot. While the system is booting, it is generally less protected. If the operating system has not yet loaded, any protection provided by the OS is not yet working. The earlier something runs in the boot process, the more power it has: It can control all execution after itself.

While Secure Boot also has weaknesses and it sometimes debated, it is supposed to alleviate some of these concerns. UEFI Secure Boot ensures that all code part of the boot sequence is authenticated and has not been tampered with.
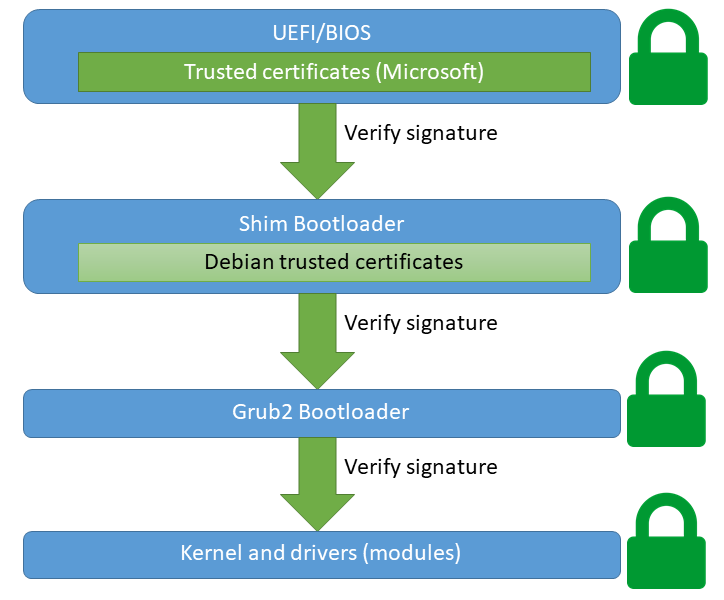
Visual flow of UEFI verification. BIOS, shim, Grub, kernel and module signatures are validated by the UEFI Secure Boot system.

This graphic means that everything involved during the boot processes must be signed by a trusted certificate. We’re assuming Debian here. By default, most mainboards (UEFI’s) only ship Microsoft’s Root UEFI certificate. Most first-party bootloaders will therefore be signed with Microsoft’s key, to be compatible everywhere.

However, non-Microsoft projects use their own infrastructures and don’t want/can’t have every update signed by Microsoft. Instead, they use their own certificates. My Debian 11 uses two certificates for this, including Debian Secure Boot Signer 2021 and Debian Secure Boot CA. These certificates ensure that non-Microsoft signed code can load. A so-called “shim” bootloader is signed by Microsoft and will load the Debian-specific code and certificates. Therefore only the shim needs to be signed by Microsoft.

Also, in case this was not clear: UEFI Secure Boot requires an UEFI boot. If your OS was installed via the legacy BIOS system (you’re booting legacy), you can’t use UEFI features such as Secure Boot. You will need to migrate to UEFI first, which often involves a difficult bootloader swap or just reinstalling the entire system with UEFI enabled. Modern systems usually come with UEFI on by default.

My Odroid H2+ has two Realtek 8125B 2.5 Gbit network cards onboard. These are damn nice things, multi Gigabit for a cheap price. However, as with all new hardware on Linux, one question is always there: “Does it work with my Linux kernel?”.

If you run an operating system with Linux kernel 5.9 or higher (Debian 11, Ubuntu 20.04+ with HWE kernel…), the answer is yes: It will work out of the box, as the R8169 module/driver shipped with the kernel supports RTL8125B since 5.9.

However, my tests indicated that while the network cards indeed work, throughput wasn’t great: I was getting barely 2 Gigabit/s in an iperf3 test, nothing close to the 2.5 Gbit/s promised by the specification. So I had a look around whether there are better drivers. Indeed it looks like there is:

Realtek indeed seems to ship its own first party driver – it’s even open source and GPL licensed, but not included in the official Linux kernel source tree. Still, I tried out this project, which builds a nice DKMS kernel module out of the Realtek driver. DKMS is “Dynamic Kernel Module Support”, a framework to generate and load kernel modules easily. It takes care of things like recompiling your modules when you upgrade your kernel or switch configurations.

After installing the DKMS module, we had the new Realtek driver (module) available. However, even after a reboot it wasn’t active: My kernel seemed to prefer its inbuild R8169 module, so I had to explicitly block that (using the method described in the readme). After this, my kernel was forced to load my new Realtek R8125B module.

That was a great success! The new module achieved a steady 2.5 Gbit/s throughput with various HTTP/iperf speedtests, just like the specification promised.

Then I enabled UEFI secure boot. And all of my network connections broke 😞. I realized the issue: My DKMS module was not UEFI signed, so the Secure Process would refuse to load it. The OS would still boot, but without the module. Because I had disabled the R8169 module, no network card driver was available.

Obviously I could just have disabled secure boot again, but that would be no fun, would it? Instead, I wanted to get Secure Boot running and keep the R8125B Realtek module. After a bit of googling, it appears that the preferred way of doing this is by employing a so-called Machine-Owner Key (MOK). That is essentially just a certificate + private key that you generate, own, and control. You add that certificate to your UEFI certificate storage, where it will be retrieved by the shim loader. It will then be available to validate kernel modules. Note that this key can by default validate everything, including your own bootloaders, kernels etc. It is possible to limit the MOK to be only valid for kernel module validation (this involves setting a custom OID on the certificate), but doing this is out of scope for this blog post. Our certificate can be used for any purpose, including loading of DKMS modules – if you have signed them with your key.

There are various tutorials out there for various distributions and versions thereof. Here’s what I did – I hope that this is the recommended way, but I’m not entirely sure.

IMPORTANT: If you’re doing this on Debian (like I did), please read Debian’s notes about Secure Boot. It includes compatibility warnings and some pitfalls, such as validation issues in certain cases.

First of all, we need to generate our MOK, meaning a certificate and key. UEFI uses standard X.509 certificates, so if you’re familiar with them this is nothing new:

# Note: This command, and pretty much everything
# else needs to run as root.
openssl req -new -x509 \
-newkey rsa:2048 \
-keyout /root/uefi-secure-boot-mok.key \
-outform DER \
-out /root/uefi-secure-boot-mok.der \
-nodes -days 36500 \
-subj "/CN=Odroid DKMS Signing MOK UEFI Secure Boot"

For those unfamiliar with X.509/OpenSSL, here’s a quick overview: This command generates new RSA private key and corresponding self-signed certificate. We store the key in /root/uefi-secure-boot-mok.key (only accessible as root, important so that no malicious non-root party can use our key) and the certificate in /root/uefi-secure-boot-mok.der. The certificate is valid for 100 years, which isn’t ideal for security, but I am lazy. If you’re paranoid, you might want to lessen the lifetime and rotate your MOK from time to time. You might also want to consider using something else than RSA 2048 keys, but consider that your UEFI loading process must support it. The Subject Common Name (CN) is arbitrary, choose whatever your like.

Next, we need to import that certificate into our UEFI firmware store, where it can be loaded by the shim. Debian and other distributions (like Ubuntu) provide excellent tooling support for this: The Mokutils and MokManager. Basically, we just run this command (as root):

mokutil --import /root/uefi-secure-boot-mok.der

When you run this command, it will ask you for a password. Choose any password, but consider the following:

  1. You will need to type in this password in a short time again. You will only need this password once, it’s a one-time use thing.
  2. You will type in this password in an environment that will likely not use your native keyboard layout, but a default QWERTY one. If possible, choose passwords that you can type even on foreign keyboard layouts.

This does not actually do any real import. What this does instead is it marks this certificate as pending for inclusion for the MokManager. The MokManager is a EFI binary (i.e. a bootable system) included with UEFI-enabled Debian/Ubuntu systems. This is the actual workhorse that will do the import.

We now reboot the system, just use the reboot command or whatever you prefer. Ensure that you have access to a display and keyboard physically connected to your device. After the reboot, you will be presented by the MokManager waiting for you. You probably need to press some key to confirm, otherwise it will just revert to a standard boot. Once you are in the MokManager, just navigate through the options it presents to you. Press “Enroll MOK”, “continue”, “yes”, then enter the password we just setup. The MokManager may use a different keyboard layout! Once that is done and your password is accepted, select OK and wait for the reboot. Your MOK is now installed!

With the MOK installed, the final piece is to sign our DKMS modules with our key. This is very easy with Debian 11 installations, as there’s a ready made helper for this. We just need to edit two files:

Edit /etc/dkms/framework.conf and remove the comment regarding sign_tool:

## Script to sign modules during build, script is called with kernel version
## and module name
sign_tool="/etc/dkms/sign_helper.sh"

We also need to tweak the sign tool slightly, edit this file too and adjust the paths of the certificate and key:

/etc/dkms/sign_helper.sh
#!/bin/sh
/lib/modules/"$1"/build/scripts/sign-file sha512 /root/uefi-secure-boot-mok.key /root/uefi-secure-boot-mok.der "$2"

Just use the same filenames and path’s you’ve used while generating the cert + key above. This tutorial uses the same names and paths in all examples for consistency.

Now, we’ve almost done it! DKMS will now sign all modules while they’re build/installed, no additional configuration necessary!

In case you have already installed (unsigned) DKMS modules, we will need to re-build them to ensure they get signed. For my realtek module this involves the following (root again):

dpkg-reconfigure realtek-r8125-dkms

The exact command here varies depending on what modules you have, but the general idea is to call dpkg-reconfigure for each DKMS module you have. DKMS modules itself should be managed by Debian’s “.deb” package system, which is is called dpkg. The Realtek DKMS module is installed by a .deb package called realtek-r8125-dkms, hence the above command will re-install this DKMS module.

Finally, reboot a last time and your modules are now loaded – with UEFI secure boot on!

Categories
Server Administration Transport Layer Security (TLS)

Deploy CAA in exchange for internet cookies

Want do to something useful? Something that (slightly) improves your security in the internet? Want some internet cookies? Then please deploy CAA.

What is CAA?

CAA means Certificate Authority Authorization. In its essence, it’s just a DNS record. You know, just like those A records that resolve names into IP addresses, or MX records that list your mailserver(s). This DNS record tells other people which Certificate Authorities (CA) are allowed to issue certificates for your domain – nothing more, nothing less.

Why is that important? Who cares about this?

I do 🙂 . No seriously, it’s a useful thing, even though it may not seem like this on first glance. A CAA record on your domain improves the security of your domain. That is because by default every CA in the entire world can issue a certificate for your domain. That isn’t ideal, because there are more than 100 companies operating one or more root certificate authorities and much more subordinate Certificate Authorities, probably well over a thousand. Every one of these can in theory go rogue and forge a certificate for your domain(s). Are all of these thousand CA’s equally thrustworthy and secure? Well, from a browser security standpoint all of these are considered “trusted”, so everything signed by them will get a green lock in your browser (or any other application using TLS). Imagine just one of them getting hacked: Even if you are not a customer of them, they can still attack your website. You can detect such attacks using The Power Of Certificate Transparency, but preventing is better than detecting, right?1

With CAA, you can decide which CA you trust. If you only use a single CA, you can tell the entire world “I only trust them, no one else may issue a certificate for me”. That’s what CAA does. The DNS record prevents anyone else from issuing a certificate for your domain. Deploying CAA can be an important difference when a CA gets hacked or goes rogue for some reason.

How does this work on a technical side? How does a DNS record prevent someone from issuing? Can’t a rogue CA just ignore the DNS record?

Yes, they can in theory. However that would be really, really bad for them. CAA is mandatory for every single publicly trusted CA since 2017. No CA is allowed to simply “ignore” a CAA record2. It must respect the record – failing to do so might cause the CA to loose it’s publicy trusted status. CAA is like a law: Failing to follow the law will likely lead to punishment. That is why it’s important to deploy CAA: If no one deploys it, there’s no benefit in having it. It’s also possible to automatically monitor whether a certificate issuance was legal according to CAA (by using the power of Certificate Transparency and checking against the CAA record) and immediatly notify authorities if a mis-issuance happens.

Okay nice, now how do I go about deploying it?

First of all, we should talk about how CAA checking works from a CA point of view. The CA climbs the DNS domain names up to the TLD and checks each name for a valid CAA record. Let me explain it by example:

If we wanted to issue a certificate for blog.germancoding.com, the CA would first check for a CAA record at blog.germancoding.com. If no CAA record is found, the CA queries germancoding.com for a CAA record. Finally, if that was unsuccesfull too, the CA queries the TLD .com (yes, that’s technically also a domain3) for a record. If there isn’t anything either, the CA can consider that there isn’t any CAA record, so issuance is allowed by everyone (allow-by-default in this case). There are edge cases like when there’s a CName record involved, but this upwards climbing is the basic principle. CAA checking is stopped upon the first match, so a CAA record on blog.germancoding.com overrides one on germancoding.com.

What I’m trying to say here is that for most people a single CAA record on the main domain is enough – subdomains are covered automatically. Records on subdomains are only needed if you want to override something, for example:
“I only want Let’s Encrypt to issue for me, but on a single subdomain only I will additionally allow Sectigo” – this is easily doable due to the climbing-up principle explained above.

The actual record may look like this:

germancoding.com. IN CAA 0 issue "letsencrypt.org"

I think this format is called the Bind Zone Format, due to Bind’s popularity it’s seen everywhere (and due to the fact that it’s a standard). This means that there is a DNS record on germancoding.com which is of type CAA – CAA Records have their own type, which is kinda special these days – most protocols scramble data into DNS using a TXT record. The actual “data” of the Record is

0 issue “letsencrypt.org”

The first 0 is a flag. This flag is currently “reserved for future use” and should simply be set to zero (the actual definition of the flag is a bit more complicated, there’s already the “critical bit”, but let’s not blow up this post any more than neccessary).

The second part, “issue” describes what action we want to do (the definition calls this a “tag”): Currently defined tags are issue, issuewild, iodef, contactemail, contactphone. Most of these (iodef, contact*) are used for (real-time) reporting of CAA violations or issues. That isn’t really neccessary to implement, the issue/issuewild tags are the important ones.

The difference between issue and issuewild is that issue controls general issuance of certificates and issuewild controls the issuance of wildcard certificates. If no issuewild is present, issue takes over and also controls the issue of wildcards, so you do not need issuewild, unless you want special treatment for wildcard certificates.

The last part is the name of the certificate authority. The format here isn’t set in stone, each CA can name themselves, so you must check your CA documentation which name they use for their CAA checking. Most CA’s I’ve seen use their primary domain name, which is what is shown in my example (my example would be valid for Let’s Encrypt).

Once you have deployed this, you can use a TLS checker (like the one from Qualys) to see how it looks in the real world (you can also do a “dig CAA example.net” from a suitable box that has the dnsutils command). If you want to double check that everything works as intended, issue a certificate from your designated CA’s and see if you’re getting errors – if so, your CAA is too strict or incorrectly set and doesn’t allow issuance.

Excursion for specialists: The RFC 8657 CAA extension

The DNS CAA standard was recently (November 2019) expanded. The definition of what is new is documented in RFC 8657.

This extension is especially interesting for CA’s that use the ACME protocol (like Let’s Encrypt). With this extension, you have more fine-grained access control how certificates can be issued for your domain. For example if you’re familiar with the ACME protocol, you know that there are multiple challenges, e.g the DNS-01 and the HTTP-01 challenge (+ the forgotten ALPN challenge). With the extension from the RFC, you can define which challenges are allowed on your domains. You could, for example, only allow the DNS challenge. This would prevent someone who has the ability to re-reoute traffic to get certificates from Let’s Encrypt using the HTTP-01 challenge even when there’s a CAA record only allowing Let’s Encrypt. This obviously means that you must use the challenges allowed by your DNS CAA record yourself. An example of the extension in action can be seen on my main domain, germancoding.com:

# dig CAA germancoding.com

;; ANSWER SECTION:
germancoding.com.  3600  IN  CAA  0 issue "letsencrypt.org; validationmethods=dns-01"

As you can see, we can place a semicolon after the name of your allowed CA. After the semicolon we can set parameters, like the allowed challenges. The CA will disallow any challenge not listed in the CAA record, if the parameter is present.

There’s more than just the validationmethods. You can also bind to a specific account URI (e.g the account number or name you have at your CA), so that only accounts under your control can issue certificates – no one can create a new account at the same CA and use that for issuance, if you set that parameter.

Please note that this standard is too new to be supported everywhere. First of all, most CA’s do not use the ACME protocol and therefore things like validationmethods usually have no meaning to them. Secondly, even our ACME exemplary CA Let’s Encrypt doesn’t support the new extension yet in production. Nevertheless, you can still deploy it today on your domains, as support will be there in the future, I’m pretty sure – Let’s Encrypt already has it in staging and it’s only a matter of time until it’s deployed in production too.

Update: After many years, Let’s Encrypt enabled this feature in production in December 2022.

Categories
Transport Layer Security (TLS)

Monitoring certificate issuance with the power of certificate transparency

Wow, what a long title. And so big! I really need to rework this site layout – or think of shorter titles.

Basics first, what is certificate transparency?

It’s a (still new) technology to monitor the issuance of certificates. (Wow what a great statement, that’s exactly the title of this post). No really, the thing is that the TLS protocol (and many other security protocols) have always had trust issues. Not psychological, but technical.

“On the Internet, nobody knows you’re a dog”

– Peter Steiner

And that’s where trust issues start. The protocols that make up the internet at it’s core do not make any guarantees about who you’re talking with. That’s a problem if you want security – if I want to talk to my banking website, how can I be certain that it’s actually my bank at the other side of the wire? Could be anyone.

In order to solve that problem, digital certificates were introduced. But to be honest, those didn’t solve the trust issue, but just shifted it. Certificates are basically a proof that you’re who you claim you are. In order to make them worth something, they need to get some kind of notarization. Those are done by certificate authorities. They are magical instances which never make mistakes and only issue certificates to good persons with a proven identity. That’s why everyone trusts these certificate authorities and that’s how we solved trust issues on the internet.

Sounds too good to be true? In fact it actually works surprisingly well. But not always. Certificate authorities (CA) make mistakes, get hacked or otherwise compromised and then you got the problem:
Because everyone trusts the CA and the power of a CA is hardly limited (there’s CAA, but we’ll keep that to another post), a fraudulent CA can pretty much issue certificates for every domain it wants.

That is obviously a bad thing and there should be protection against that – and there is! One way of protection is certificate transparency.

You still haven’t told what that is…

We’ll get there. The idea behind Certificate Transparency is a requirement that all certificates must be logged publicy. If you can force every CA to always and without exception log every certificate that it issues, you can at least detect immediatly when a CA goes full rogue – with smart (and automatic) monitoring you can also detect other abnormalities in the certificate ecosystem, but that’s way beyond the scope of this post.

And how does it work exactly?

Sadly, the details are also way beyond the scope of this post. To make it short, Google Chrome (and other browsers, most notably Apple products) requires every freshly issued certificate to appear in a public log that records all certificates. If a certificate isn’t logged there, the browser does not allow a connection to the website. That’s how you force every CA to log every certificate issuance there. There’s a lot of crypto involved to make sure that certificates can prove they’re part of a log and the logs use a Merkle tree to prove they’re also doing fair-play.

I’m not a certificate authority. If it works, why should I care about certificate transparency?

The thing is, certificate transparency is pretty worthless if it isn’t fully utilized. If every certificate is put into a log, but no one watches that log, the log is useless. There are a few people and companies that monitor all logs for unusual behavior and notify relevant authorities if something happens. But that isn’t enough to detect every attack. Small (e.g. single domain) attacks cannot be detected by large-scale monitoring. That only works if domain owners do their own monitoring.

Note that certificate transparency logs are public. That means anyone is free to query them if they want to. That’s something that we can utilize. If you’re a domain owner, you can setup an automatic monitor application that tells you whenever someone issued a certificate for your domain. Imagine someone took over your domain unnoticed – maybe due to a leak, DNS hijack or something else. If an attacker has (limited or full) control over your domain, they can most likely also issue a fake certificate for the domain and thus even intercept encrypted communications via a man in the middle attack.

Certificate Transparency can help in detecting such attacks.

If you have a monitor that tells you who has issued certificates for your domain(s) recently, you get notified immediatly that something’s wrong. That in itself doesn’t fix your security hole, but at least aids in early detection and possibly mitigation of further breaches.

That sounds fine, but where/how can I monitor my domain(s)?

The ideal way would be to query all certificate transparency logs yourself. But that’s a complicated and resource-intensive thing, which we will not cover here.

Luckily, there’s a “cheap alternative”. Theres a service, hosted by Sectigo (formerly Comodo), called crt.sh. They automatically query all approved certificate transparency logs and put every certificate in a public database, that can be nicely accessed – both via web and via PostgreSQL.

If you want automatic monitoring for your domains, you can just access that website (or database) periodically, fetch every certificate for your domain and look for new ones. And that is it! That’s what basic monitoring is. You can get pretty sophisticated monitoring, sure, but a simple email notification should already do the trick for most people. You will probably need a human though to determine if a new certificate issuance was “legal” (remember, Let’s Encrypt certificates are renewed/re-issued every 60 days) or fraudulent (you can in theory automate this, but it’s not that easy).

crt.sh protip: When querying the web service of crt.sh, putting the parameter output=json in a query will get you results in nice JSON format – much easier for scripts. For example, if you want all certificates for %.germancoding.com (% means “match anything”) you could do this:
https://crt.sh/?q=%25.germancoding.com&output=json

If you go to advanced search you will see some more web filter options (like excluding expired certificates). For implementation details, or if you want to access the database directly, it’s probably best to head over to their forums and look for answers there – most things are explained there.

Tutorial time: Simple monitor python script

The following is an example script that does the following:

  • Fetch all currently valid certficates from crt.sh for a few given example domains (germancoding.com and a few more in this example)
  • Bail out if that fails, but have automatic retries too
  • Load a local SQLite database from disk (“knowncerts.db”) that stores all certificates that we already know
  • Compare list of certificates from crt.sh with the local database, look for new certificates
  • If one or more new certificates are found:
    • Try to fetch additional information about them
    • Then send an email to a preconfigured address, telling them about the new certificate(s)
    • Finally, add the new certificate(s) to the local database

Known caveats and other things to know about the script:

  • The script relies on some python-dependencies (subprocess, requests, sqlite, urllib3, and json) being available (as well as python itself of course)
  • The script relies on some OS commands being available:
    • ‘openssl’ command in order to parse a new certificate
    • A working ‘mail’ command in order to send emails
  • The local SQLite database ‘knowncerts.db’ must already exist locally. In order to create the database, you need to do the following:
    • Make sure sqlite/sqlite3 is installed (including the python module)
    • sqlite3 knowncerts.db will create a new database (or open an existing one)
    • Executing CREATE TABLE IF NOT EXISTS certs (id text, serial text); in the freshly opened SQLite-terminal will create the neccessary table structure expected by the script.
    • Type .exit to get out of that terminal.

Now, let’s finally get to it. The formatting below is a lot different than the rest of this page, but this snippet really needs as much space as it can get.

import subprocess
from urllib3.util.retry import Retry
import requests
from requests.adapters import HTTPAdapter
import sqlite3
from subprocess import Popen, PIPE
import json

# Replace email with your own
email = "your-email@example.com"

# Replace domain(s) below with your own
# The OR syntax is understood by crt.sh and searches
# multiple domains
domains = "%.germancoding.com OR example.com OR letsencrypt.org"

# Setup a retry system in case crt.sh has temporary hiccups
session = requests.Session()
retry = Retry(
   total=10,
   status=10,
   status_forcelist=[429],
   backoff_factor=1,
   respect_retry_after_header=True,
)
adapter = HTTPAdapter(max_retries=retry)
session.mount('http://', adapter)
session.mount('https://', adapter)

payload = {'Identity': domains, 'exclude': 'expired', 'output': 'json'}
r = session.get('https://crt.sh/', params=payload)
r.raise_for_status()
allcerts = r.json()

changes = False
conn = sqlite3.connect('knowncerts.db')
c = conn.cursor()
c.execute("SELECT id FROM certs");
knowncerts = c.fetchall()
knowncerts = [i[0] for i in knowncerts]
knownserials = []
for item in allcerts:
   id = str(item['id'])
   if id not in knowncerts:
      domain = item['name_value'].strip().splitlines()[0]
      text = "ERROR UNDEFINED TEXT"
      serial = "ERROR"
      sendmail = True
      try:
        # Get PEM cert from crt.sh and print it using OpenSSL
        payload = {'d': id}
        r = session.get('https://crt.sh/', params=payload)
        r.raise_for_status()
        pem = r.text
        domain = subprocess.run(["openssl", "x509", "-subject", "-noout"], input=pem, text=True, check=True, capture_output=True, timeout=5).stdout.replace("subject=", "").strip().splitlines()[0].replace("CN = ", "")
        serial = subprocess.run(["openssl", "x509", "-serial", "-noout"], input=pem, text=True, check=True, capture_output=True, timeout=5).stdout
        serial = serial.replace("serial=", "").strip().splitlines()[0]
        c.execute('SELECT id, serial FROM certs WHERE serial=?', [serial])
        if len(c.fetchall()) > 0 or serial in knownserials:
           #print("debug: serial already known")
           sendmail = False
        text = subprocess.run(["openssl", "x509", "-text", "-noout"], input=pem, text=True, check=True, capture_output=True, timeout=5).stdout
      except Exception as e:
        text = "(Failed to fetch additional data - " + repr(e) + ")"
        pass
      c.execute("INSERT INTO certs VALUES(?, ?)", [id, serial]);
      if sendmail:
         mailbody = "Issued cert can be found at https://crt.sh/?id=" + id + "\n\n\n" + text
         subprocess.run(["mail", "-s", "New cert " + domain + " for a monitored domain", email], input=mailbody, text=True, check=True, timeout=60)
      knowncerts.append(id)
      knownserials.append(serial)
      changes = True
if changes:
  conn.commit()
c.close()
conn.close()

You can put the script above in a certnotify.py python file and run it with a cronjob, hourly or so:

# crontab -e

27 * * * * python3 /path/to/certnotify.py >> /var/log/certnotify/certnotify.log 2>> /var/log/certnotify/certnotify.err.log